Tip If you're trying to troubleshoot this event detail page error message, "Sorry, you may not have permission to view that event or it may have been deleted.", see Troubleshoot an event detail error.
You use control spuds on the same page as your main calendar spud. Visitors interact with control spuds to change the state of the main calendar spud. For example, you can add control spuds that let visitors change the view, filter the events they see, and search by keyword or location.
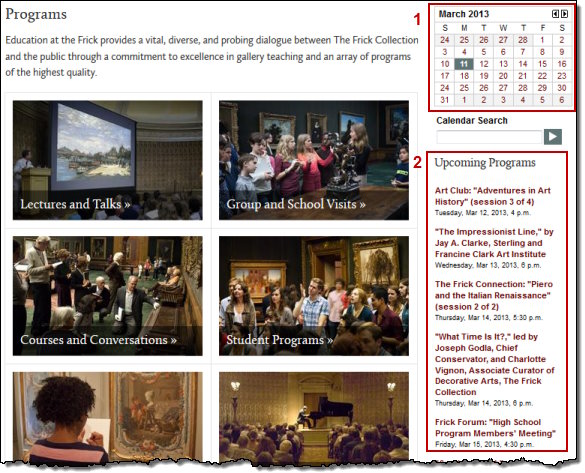
The following image shows several control spuds above and beside the main calendar.

Promotion spuds promote events. You use them on pages of your website that do not contain your main calendar spud to attract the attention of site visitors and direct them to the main calendar page.
Tip You can include date icons with the events in your promotion spuds. Learn more.
To add control and promotion spuds, you go to the Control Spuds and Promotion Spuds tabs in the Publishing Control Panel. For each spud you add, Trumba Connect generates the script that you use to embed the spuds into your webpages.
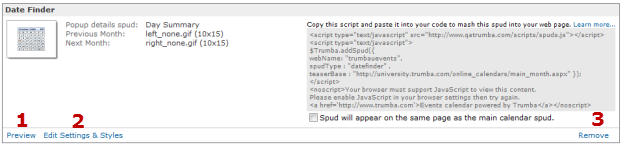
Tip When you first visit the tabs for a newly published calendar, you see the most popular spuds already in place. These spuds include the Month List, Search, and View Chooser control spuds and the Date Finder and Day Summary promotion spuds. You can preview (1) and edit the settings (2) for each of these default spuds. Or, if you decide not to use one of these spuds, you can easily remove it (3) (default spuds you remove are still visible in the hosted view).
If you haven't published your calendar yet, go through the publishing settings, and click OK.
The available settings and styles vary widely depending upon the type of spud you're adding.
By default, spuds inherit the base calendar styles but you can modify any of the settings for a specific spud.
I'd like more information about base styles and the Color Picker.
For promotion spuds, some of the important settings include selecting the start and end dates, the number of events you want the spud to show, the timeframe you want the spud to cover, whether to show multi-day events on just the first day or on all days on which they occur, and whether to include event registration buttons and date icons with events.
For example, if you set the end date to be Current day +180 days and number of events to 12, and the number of events on your calendar during the next 180 days is greater than 12, the spud will display only 12 events. On the other hand, if the next event starts 181 days from the current date, no events will appear in the spud.
Tips
The spud appears on the Control Spuds tab or Promotion Spuds tab, along with the script you copy to embed it in your webpage.
Tip You can modify a spud's settings and styles at any time by finding the spud on the Control Spuds or Promotion Spuds tab, and then clicking Edit Settings & Styles.
You can remove any of the default spuds you see when you first visit the Control Spuds or Promotion Spuds tab. You can also remove any spud you add yourself.
Caution If you embedded the code for the spud you're removing into any of your webpages, be sure to delete the code before you remove the spud. If code for a spud you remove is still embedded, the spud appears but it reverts to the default styles and settings. If you add the spud back to the control panel, you have to reset the custom settings manually.
The spud and its script code disappear from the tab.